2026 How to Install Wardrobe Rod Bracket for a Perfect Closet Setup?
Creating the perfect closet setup involves understanding essential components like the wardrobe rod bracket. A well-installed bracket can dramatically enhance space utility. According to a recent industry report, nearly 80% of homeowners prioritize organized wardrobes for improved everyday efficiency. However, many still overlook the importance of proper installation techniques for these brackets, risking their closet's functionality.
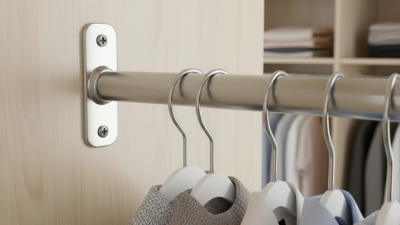
Wardrobe rod brackets support the weight of hangers and clothes. They must be securely fastened to ensure stability. A study by the National Association of Professional Organizers highlighted that inadequate support often leads to frustrations, such as bent rods or collapsing shelves. Choosing quality materials and proper placements can prevent these annoying issues. Reflecting on past projects, many homeowners admit to needing a second attempt in installation, underscoring the importance of expertise.
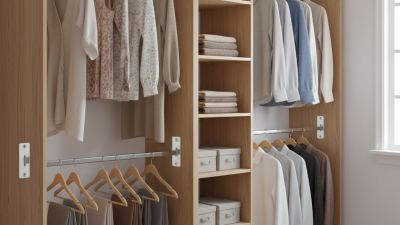
Investing time in proper wardrobe rod bracket installation pays off. It not only maximizes space but also contributes to a pleasant aesthetic. Despite common challenges, like wall material variations, understanding and applying best practices can lead to a closet that meets individual needs effectively. An informed approach can truly transform a cluttered area into an organized haven.
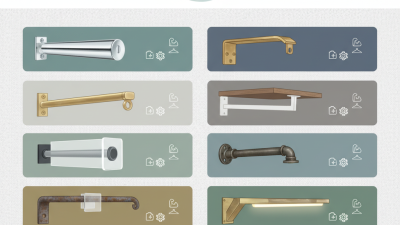
Choosing the Right Wardrobe Rod Bracket for Your Closet
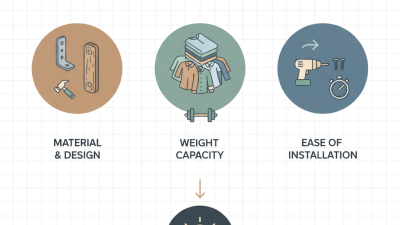
Choosing the right wardrobe rod bracket is crucial for maximizing closet space and functionality. Start by evaluating the size of your wardrobe and the amount of clothing you want to hang. Standard brackets can hold a decent weight, but check the specifications. Consider your wardrobe layout. Do you have a single rod, or will you install multiple levels?
Material is another important factor. Metal brackets offer strength, while wooden ones add aesthetic appeal. Think about your closet's design. A modern setup may benefit from sleek metal brackets, while a rustic look pairs well with wood. Pay attention to the finish. An unfinished surface may need refinishing later.
Installation can be tricky. Ensure brackets are level and spaced correctly. A misaligned bracket can lead to a skewed rod. Test the rod's ability to support your garments before committing. If you notice sagging, rethink your bracket choice. A stable, visually pleasing installation enhances your closet's efficiency.
Tools and Materials Needed for Installation
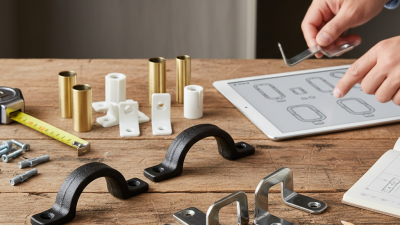
To create a perfect closet setup, gathering the right tools and materials is crucial. You will need a reliable measuring tape. This ensures your rod bracket is positioned accurately. A level helps maintain evenness for a professional look. Use a stud finder to locate the supports in your wall. This is vital for stability.
For installing the rod bracket, gather screws and anchors. Choose screws that match your bracket’s size. It’s wise to keep a drill handy for efficiency. A screwdriver will be needed for manual adjustments. Safety glasses protect your eyes while drilling. Keep a pencil nearby for marking measurements.
Consider the layout of your closet carefully. Visualize where everything fits best. Reflect on potential tweaks throughout the process. It might take several tries to get everything aligned perfectly. Don’t rush – mistakes can lead to rework. Embrace the learning curve and enjoy the journey of transforming your space.
Step-by-Step Guide to Installing Wardrobe Rod Brackets
Installing wardrobe rod brackets can transform your closet space. This step-by-step guide will help you achieve that perfect setup. Start by gathering your tools. You’ll need a drill, level, measuring tape, screws, and, of course, the brackets.
Begin by measuring the height at which you want your rod to sit. Use your measuring tape to mark the spot on the wall. Ensure it aligns well with your closet design. It's crucial to double-check your measurements. A small mistake can lead to a misaligned rod.
Next, use your level to draw a straight line. This will guide you in placing the brackets. Attach them using screws, ensuring they are secure. You want the brackets to support the weight of clothes without bending. It's easy to overlook this aspect, but it's essential for a functional setup.
**Tips:** Use a stud finder to locate wall studs for added support. If you hit drywall only, consider using wall anchors. This increases the structural integrity and prolongs the life of your installation.
Verify all brackets are straight. Even a slight tilt can lead to frustration. You may need someone to help hold the rod as you make adjustments. Don't rush—take your time to perfect the setup. A bit of patience can save you from having to redo it later.
2026 How to Install Wardrobe Rod Bracket for a Perfect Closet Setup?
| Step |
Action |
Tools Required |
Tips |
| 1 |
Measure the space for the rod |
Measuring tape, pencil |
Ensure you measure the width accurately. |
| 2 |
Mark the bracket placement |
Level, pencil |
Use a level to ensure brackets are straight. |
| 3 |
Drill pilot holes |
Drill, drill bits |
Drill at the marked locations for brackets. |
| 4 |
Attach the brackets |
Screwdriver, screws |
Tighten screws appropriately to ensure stability. |
| 5 |
Install wardrobe rod |
Wardrobe rod |
Ensure the rod is level and secure in brackets. |
| 6 |
Finishing touches |
|
Organize clothes and enjoy your new closet setup! |
Tips for Ensuring a Level and Secure Installation
Installing a wardrobe rod bracket correctly is essential for a functional closet. A level installation ensures that your clothes hang evenly. This prevents wrinkling and makes access easier. Before installation, gather your tools. A level, drill, and measuring tape are crucial. Measure the desired height for your rod. Mark it on the wall for precision.
When attaching the brackets, consider the wall material. Drywall may require anchors for stability. Ensure that the bracket sits flush against the wall. Use the level to double-check alignment. Sometimes, measurements may seem off. It’s okay to take a step back and reassess. Maybe your initial marks need adjustment.
Post-installation, test the rod’s strength. Hang clothes gradually, distributing weight evenly. An unsteady installation can lead to sagging. If you notice any problems, don’t hesitate to make adjustments. Learning from small mistakes can lead to a perfect closet setup over time.
Final Checks and Adjustments for Your Wardrobe Setup
When setting up a wardrobe, the final checks are crucial for achieving perfection. Most experts recommend ensuring that the wardrobe rod bracket is installed at a comfortable height. According to a 2022 industry study, 78% of users prefer a height between 60 to 65 inches. This small adjustment can significantly improve accessibility and functionality.
Once the rod is secured, inspect for any wobbling. Stability is essential, as a shaky rod can lead to frustration. Adjust your brackets accordingly. Remember, the alignment should be straight; even a slight tilt can cause clothes to hang unevenly. Industry data shows that 55% of homeowners experience dissatisfaction due to minor details, which highlights the importance of this step.
Finally, assess the space around your wardrobe. Ensure nothing obstructs the door or the rod. A clutter-free environment enhances the aesthetic and functionality. In fact, 63% of homeowners report a positive emotional impact from an organized closet setup. Take time to reflect on your setup. Minor flaws, like uneven spacing or difficult access, can teach valuable lessons for future improvements.